MCP Server
Where: top navigation → MCP Server.
The MCP Server screen is where you pick, configure, and inspect a single MCP connection. The left rail is a 3-layer sidebar (Built-in / Active / Inactive) under a sticky MCP Server Connections (N) header and a shared filter bar. The right pane is MCP Server Info - a connection form whose content swaps in to match whichever row is selected on the left, without ever leaving the page. The screen serves two audiences at once:
- It validates tools that Spring AI Playground itself publishes through the built-in MCP server (always pinned to the top of the sidebar).
- It is the client-side inspection surface for external MCP servers - anything you activate from the catalog, or any custom STDIO / HTTP / SSE / OAuth 2.1 server you wire up by hand.
Catalog & Sidebar Filtering
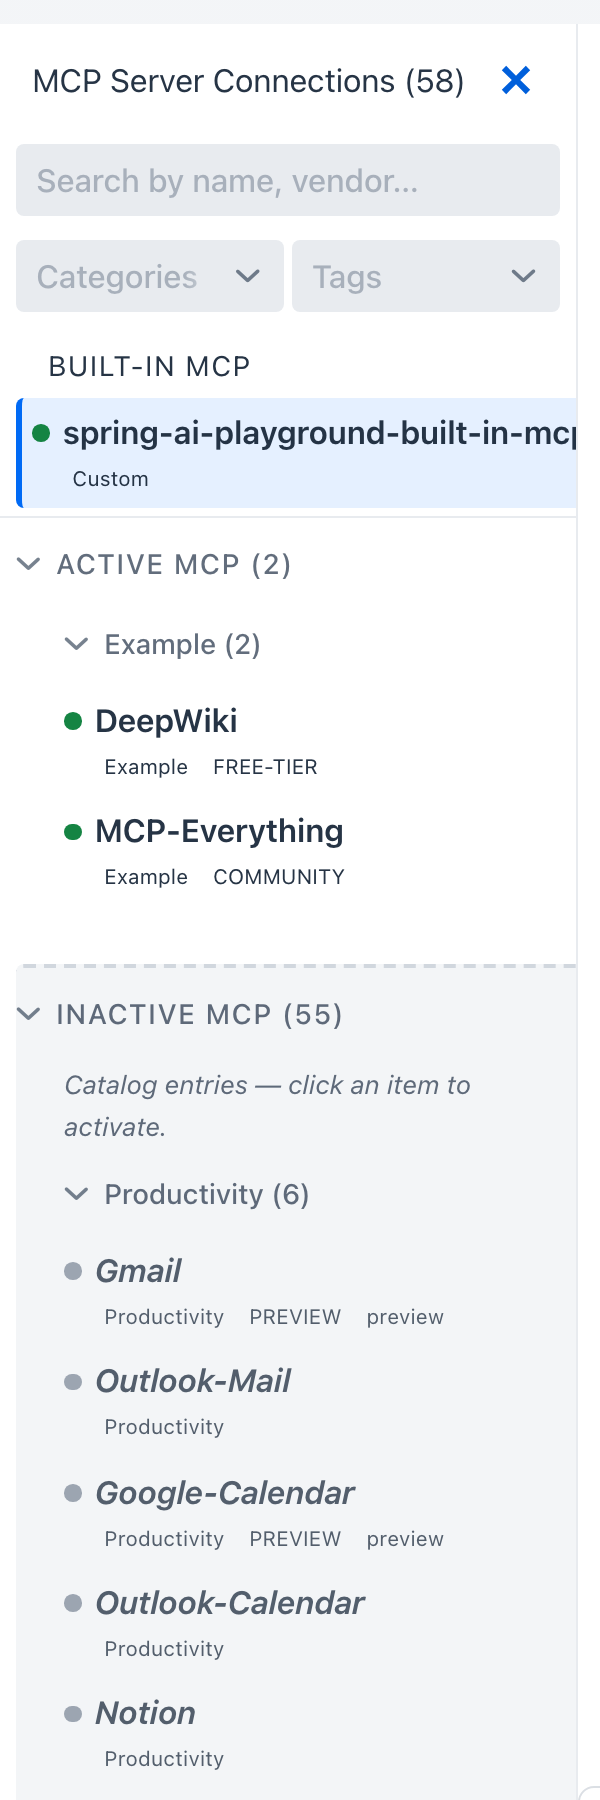
The sidebar splits into three layers from top to bottom under a sticky filter bar:
- Built-in MCP - the always-on local server that publishes the tools authored in Tool Studio. Pinned flat at the top, no category group. A coloured status dot beside the name reflects the last health check: green for OK, red for a transport-init or ping error, gray for not yet connected.
- Active MCP (N) - user-activated remote and stdio servers, grouped per category. Each row shows the matching category pill, any tag pills (e.g.
COMMUNITY), and a stability pill (preview/beta) where applicable. Empty by default with the inline hint "No active MCP yet - activate one from the Inactive MCP list below." - Inactive MCP (N) - the 57-entry preset catalog (49 vendor-official remote + 8 community stdio per OS), grouped per category. Rows render as ghost-style to stay visually distinct from active connections: italic name, neutral dot, dashed top border, 5 % shade background. Categories that carry a coloured tile -
PREVIEW,FREE-TIER,KOREA,LEGAL- surface stability and cohort signals on the group header itself. Hint text under the section: "Catalog entries - click an item to activate."
The sidebar header counter swaps between (N) and (N filtered of M) depending on whether a filter is active. When no entry matches and the search box has text, an empty-state panel offers a Clear filters button.
Filter bar
Just below the sidebar title sits a three-control filter bar (shared webui/common/sidebar/SidebarFilterBar widget) - a search input, a Categories multi-select (13 catalog categories plus Custom), and a Tags multi-select (11 cohort labels). The three controls compose AND across groups, OR within a group.
For the per-control behaviour, full categories/tags vocabulary, AND/OR composition examples, and how the right-pane connection form prefills when you click a row, see Default MCP Servers → Sidebar filtering and form prefill.
Live status in the sidebar
Each connection in the Built-in MCP and Active MCP layers carries a colored dot that reflects its last health check: green for OK, gray for offline (not connected), red for a transport-init or ping error. The dot updates as the playground reconnects or re-pings, so a connection that drops mid-session is visible without opening the Inspector. Catalog entries in the Inactive layer render in italics with a neutral dot - they're ghost rows that haven't been connected yet.
Activate from the catalog
Clicking any Inactive MCP entry copies the catalog template into the configuration form on the right pane:
- transport -
STREAMABLE_HTTPfor remote entries,STDIOfor the per-OS entries - URL or command + args - with
${ENV_VAR}placeholders for anything secret. STDIO arguments render as one row per argv element so individual values stay editable. - OAuth issuer URI + scopes - pre-filled for OAuth-protected entries
- category + tag chips - matching the catalog row
- inline description - carrying any prerequisites and a
Docs:link
For example, clicking MCP-Everything under Example lands an STDIO row pre-filled with Command /usr/local/bin/npx, Arguments -y + @modelcontextprotocol/server-everything, Category EXAMPLE, Tags community + global, and a description carrying the macOS prereq (Node.js 18+) and the Docker fallback.
The row stays in the Inactive layer until you click Save & Connect; on save the row moves into the Active layer under the same category group and the playground spawns the child process. For OAuth entries this records the registration without yet connecting - see OAuth 2.1 Authorization Code below for the Authorize click.
For the full per-category browse of the 57 catalog entries, see the Default MCP Servers directory.
Add Custom Server
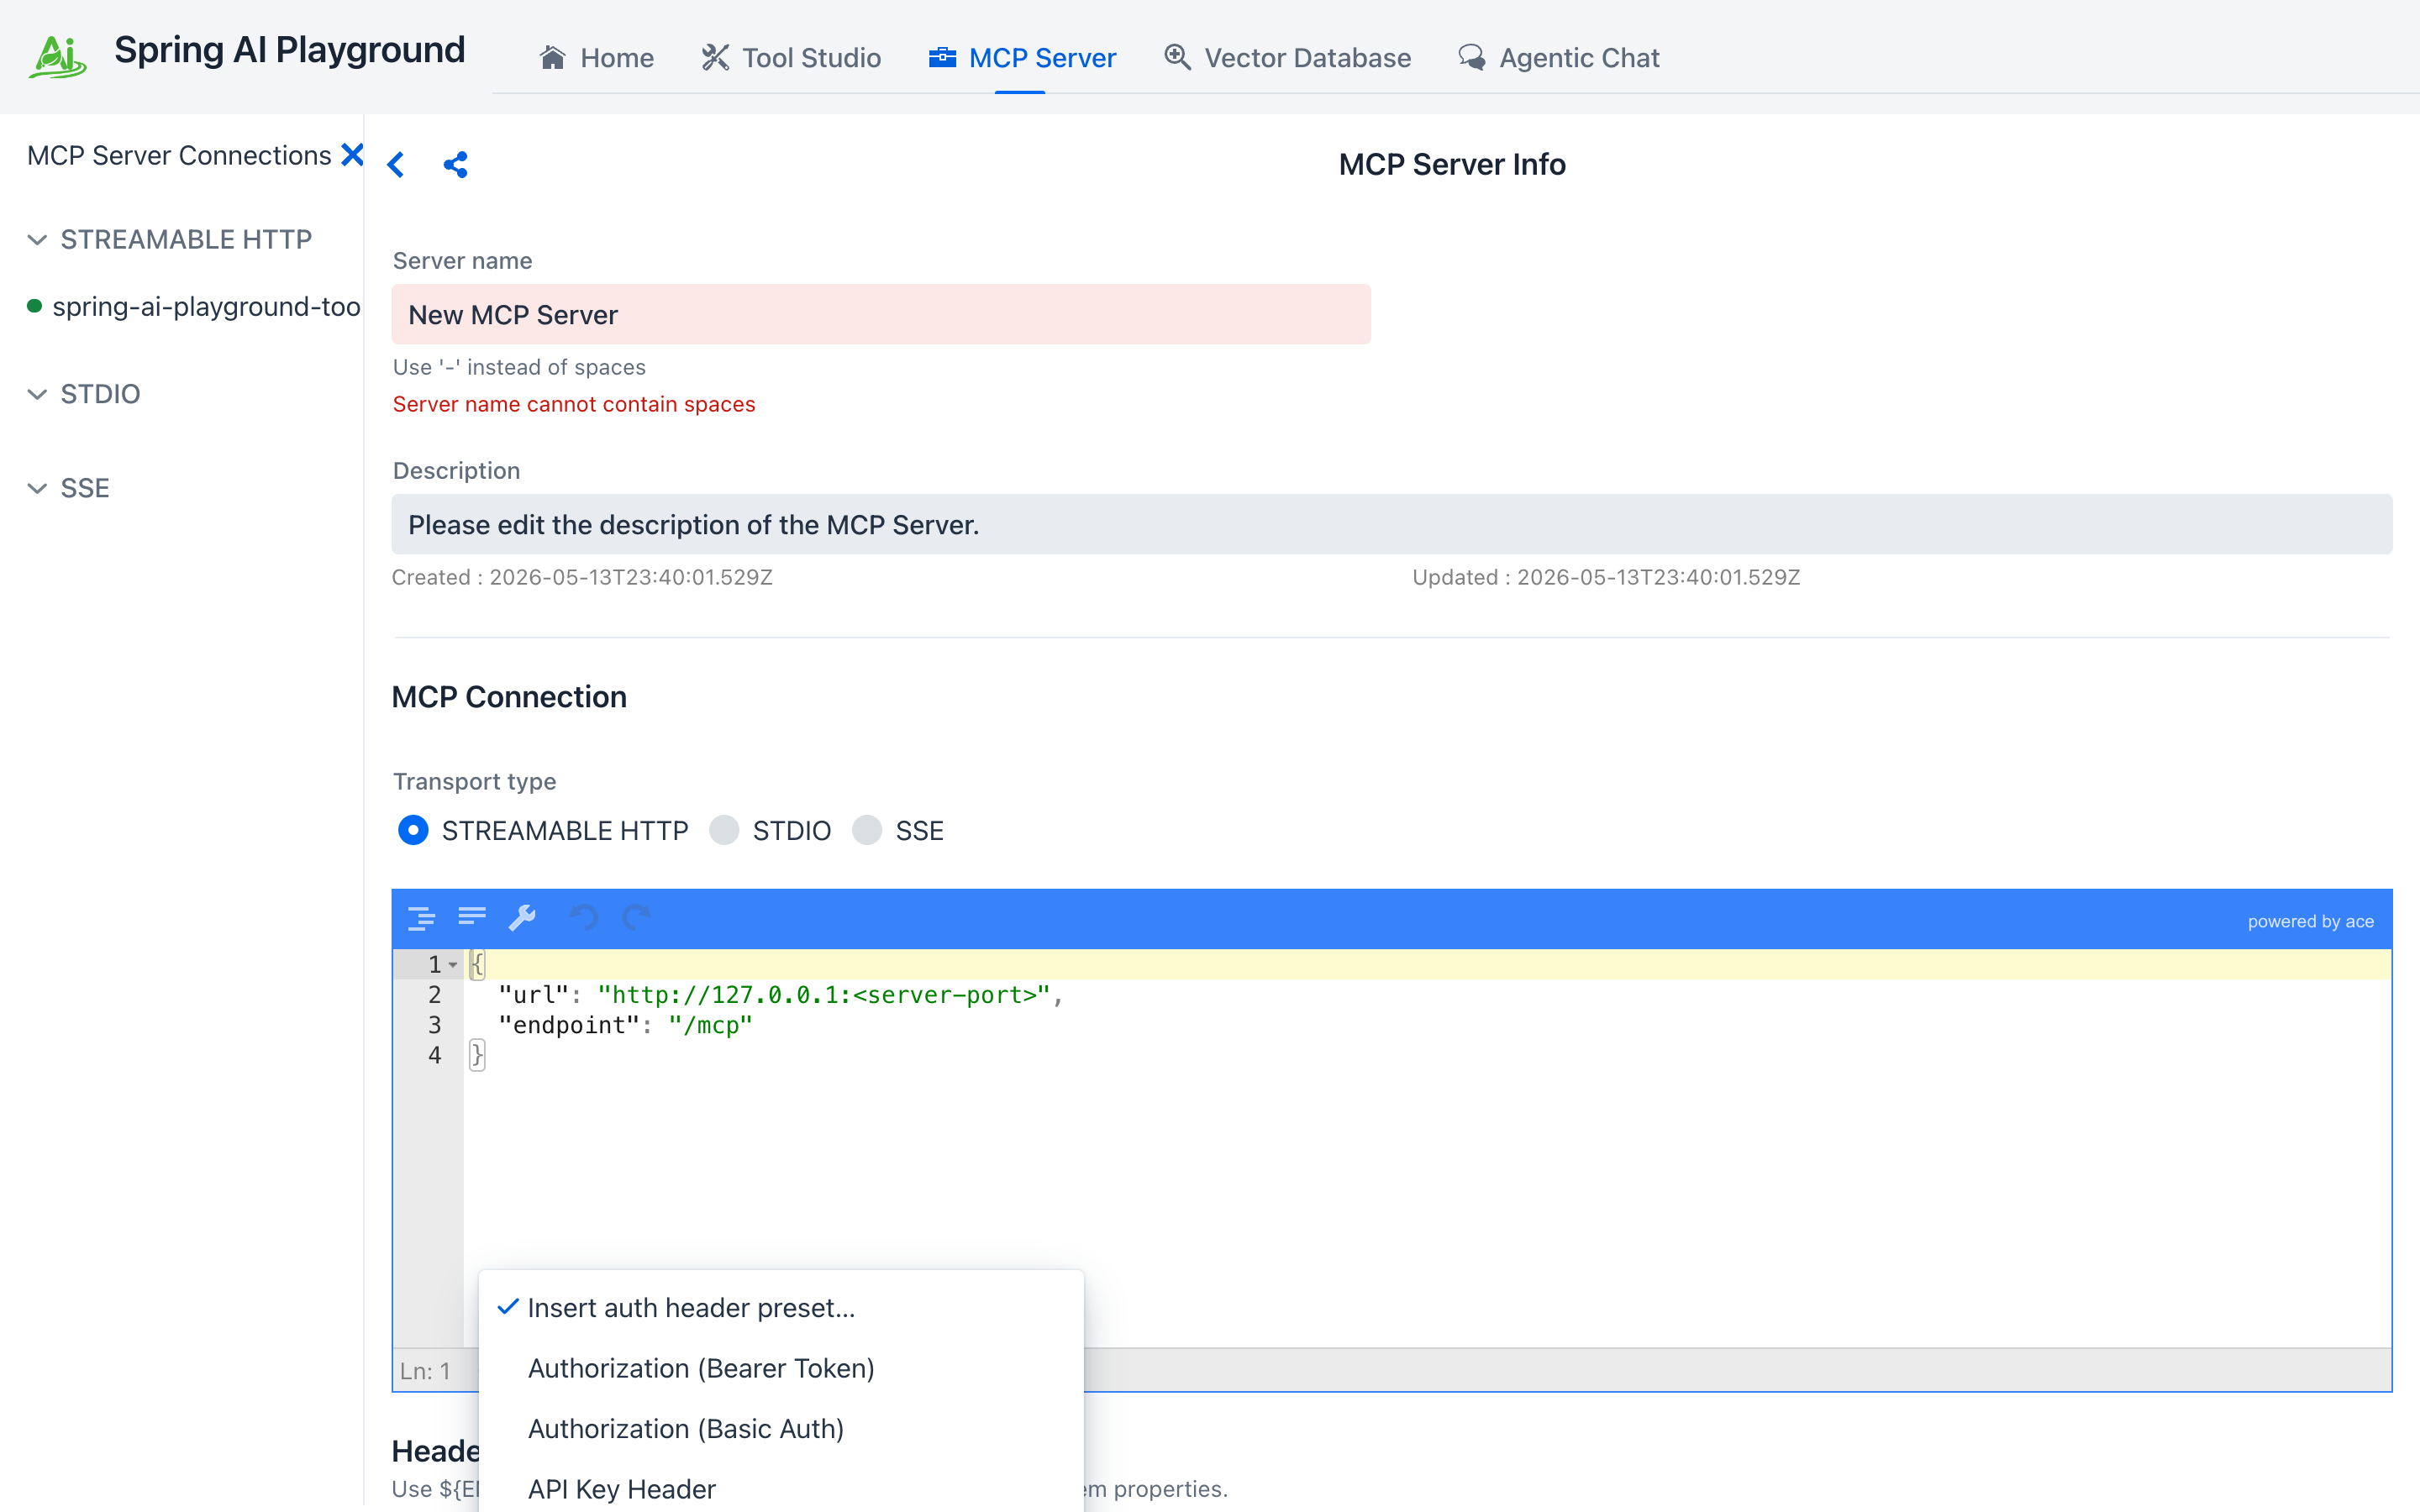
When a server isn't in the catalog, the Add Custom Server header CTA opens an empty configuration form. Defaults: Streamable HTTP transport, Custom category, placeholder URL http://127.0.0.1:<server-port>, /mcp endpoint, default description "Please edit the description of the MCP Server.", and an empty headers preset dropdown.
Three field constraints worth knowing before saving:
- Server name - pre-filled to
New MCP Server. The constraint is[A-Za-z0-9._-]+(no spaces) so the persisted JSON file name stays inside the save directory; typing a space surfaces an inline red validation note. - Category - defaults to
CUSTOM. The combo accepts a typed value to create a new label, or picks from the 13 built-in catalog categories. - Tags - free-form; the chip picker suggests cohort tags already in use across the active list and catalog.
The Headers section's Insert auth header preset... dropdown drops a templated row (Bearer / Basic / API Key) with ${VAR} substitution wired in; the + button next to it adds a blank row. OAuth 2.1 has its own checkbox-toggled sub-form further down.
Browse the Default MCP Servers
The 57 catalog entries are documented in their own directory under Features. Use the Default MCP Servers index for a full searchable card grid (Category / Tag / Transport chips), or jump directly to a category-cohort sub-page:
| Sub-page | Categories merged | Entries | What lives there |
|---|---|---|---|
| Productivity & Communication | Productivity + Communication | 8 | Mail, calendar, notes, chat, team messaging - Gmail, Outlook Mail / Calendar, Notion, Slack, Microsoft Teams, Kakao PlayMCP |
| Dev & Project Management | Dev + Project Management | 12 | GitHub, Linear, Atlassian Rovo, Sentry, Asana, Azure DevOps, Microsoft Learn, Context7, Korean Law + stdio: Git, Puppeteer, Playwright |
| Data & Cloud | Storage + Database + Cloud | 17 | BigQuery, Neon, Supabase, PlanetScale, Google Cloud (SQL / Spanner / Firestore / Run / Storage), Drive, OneDrive, Cloudflare, Vercel, Netlify, Render, Heroku + stdio SQLite |
| Business | Finance + CRM + Design + Utility | 12 | Stripe, PayPal, Square, HubSpot, Intercom, Mixpanel, Figma, Canva, Webflow, Google Maps Grounding + stdio: Memory (Knowledge Graph), Sequential Thinking |
| Search | Search | 6 | Tavily, Exa, Firecrawl, Jina AI, SerpAPI + stdio Brave Search |
| Examples | Reference test servers | 2 | MCP Everything (protocol-coverage reference), DeepWiki (free library docs) |
Each sub-page carries the per-entry card grid plus Workflow combinations, Auth & secrets, and a Picking guide decision matrix tuned to that category cohort.
Connection Management
A connection is created in one of two ways:
- From the catalog - click any Inactive MCP entry; the form pre-fills with the catalog template and Save & Connect finishes the activation. This is the path for the 57 catalogued vendor surfaces.
- From scratch - click Add Custom Server; the form opens with the defaults above. Use this for anything not in the catalog.
The MCP runtime supports multiple transport styles:
- Streamable HTTP - the modern single-endpoint transport formalised in the MCP v2025-03-26 specification. Clients POST JSON-RPC requests to
/mcp, responses stream when supported, session-oriented behavior layers on top. This is the form used by the built-in MCP server and by 49 of the 57 catalog entries. - STDIO - JSON-RPC over the spawned process's stdin/stdout. The form exposes Command + Args + Env fields; the catalog ships 8 stdio entries in OS-specific variants (macOS / Linux use
npxoruvx; Windows usesnpx.cmd) and the sidebar picks the variant matching the host OS so the pre-filled command saves without editing. - Legacy HTTP plus SSE - kept for compatibility with older external MCP integrations; the form exposes a separate SSE Endpoint field.
Test Connection without disturbing live clients
The config form has a Test Connection button next to Save & Connect. It spins up a transient sync MCP client, runs initialize and a one-shot listTools, then disposes the client - without touching the running connection map. Use it to validate a config change against a remote server before saving, which would otherwise replace the live client and might briefly drop tool availability in chat.
Custom HTTP headers and ${ENV_VAR} substitution
HTTP and SSE connections both expose a single Headers section in the config form, edited as key/value rows. The same row layout drives the auth-preset dropdown - picking Authorization (Bearer Token), Authorization (Basic Auth), or API Key Header inserts a templated row whose value you fill in. Picking a preset fills the first empty row if one exists, otherwise appends a new row. OAuth 2.1 servers use a dedicated checkbox-toggled sub-form covered in the next section.
STDIO connections' Env section uses the same add/delete row UI - the + button next to the section header adds a blank row, and each row's trash button removes it.
Header values, STDIO env values, and any name listed in requiredEnv accept ${VAR} placeholders that resolve from the OS environment at connect time (with a JVM system-property fallback). The persisted JSON stores the placeholder string literally; the actual value only enters memory when the connection is brought up. A missing reference throws at connect time instead of silently sending an empty header.
Connection-error notifications and per-call invocation logs are swept by the SecretMasking filter - any string that matches a resolved ${VAR} value is replaced with *** before the UI renders it. See Safety Architecture → Secret masking for the full pipeline.
OAuth 2.1 Authorization Code
For servers that expect an OAuth dance instead of a static token (Notion, Linear, Atlassian Rovo, the Workspace catalog entries, ...) the form exposes a dedicated OAuth 2.1 Authorization Code sub-form. Open it by ticking the Use OAuth 2.1 authorization checkbox on the form. Unticking it drops the OAuth block from the persisted config entirely.
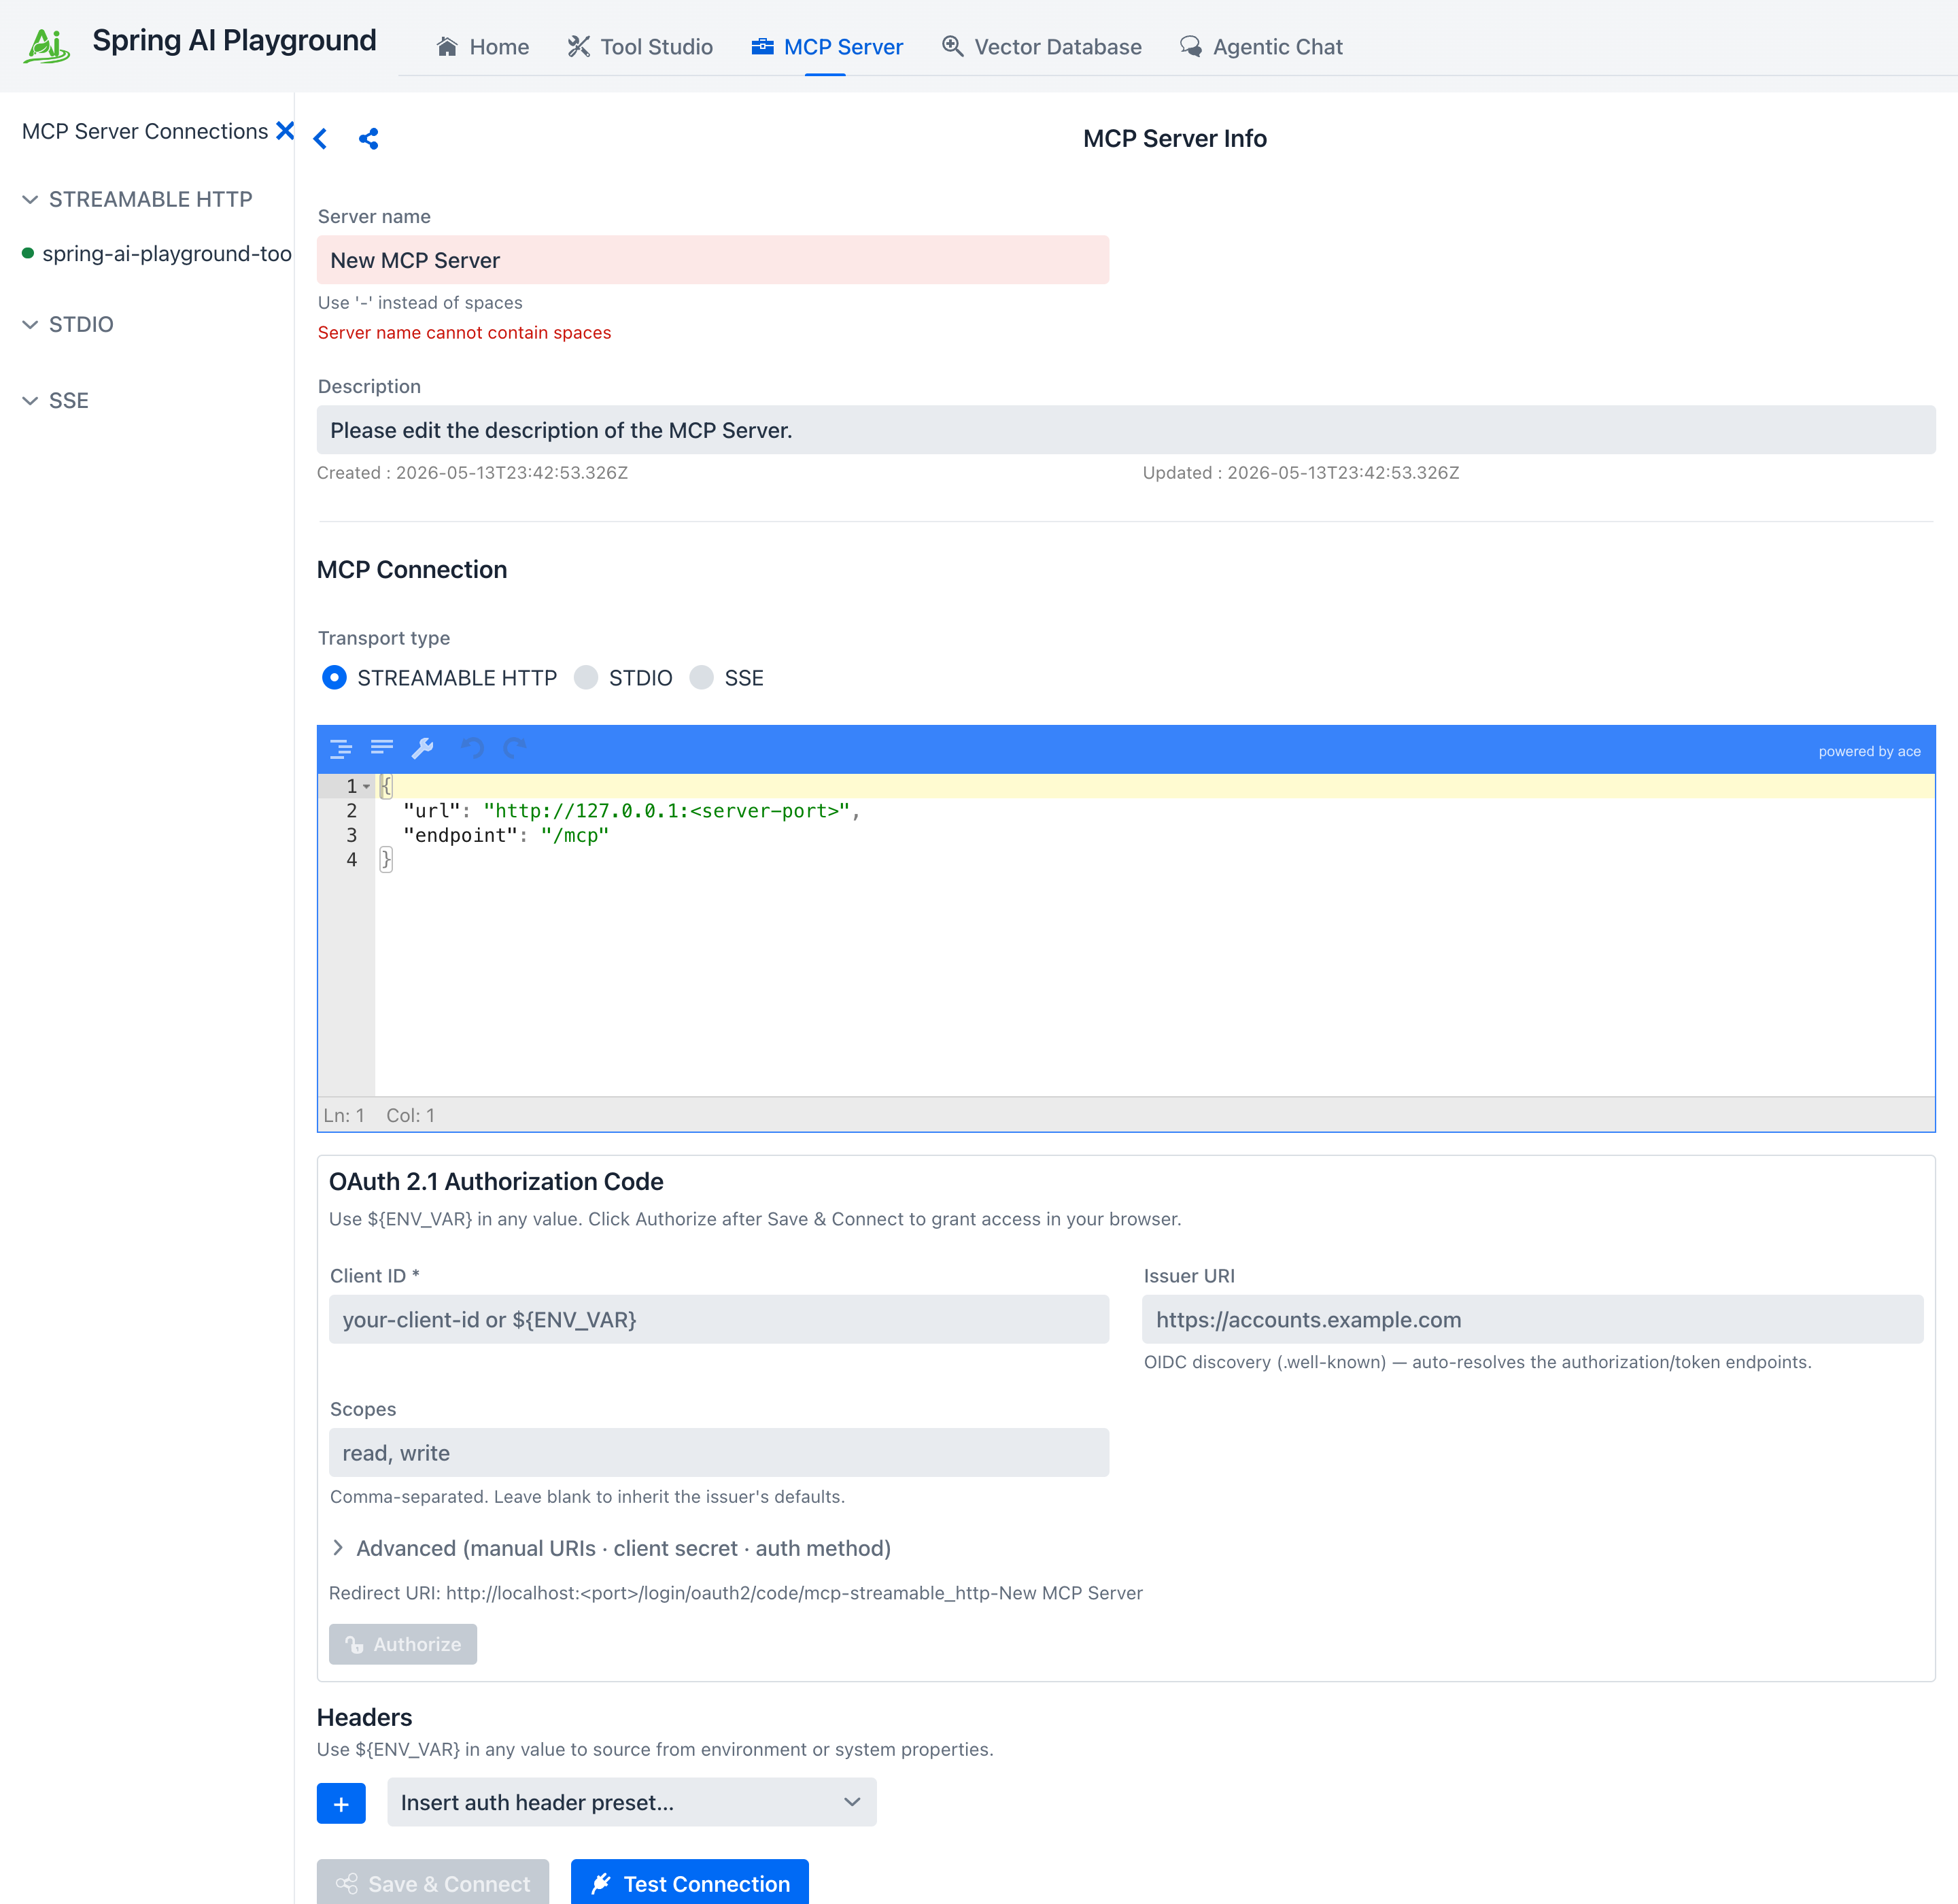
The sub-form has five fields plus an Advanced group:
- Client ID (required) - accepts a
${ENV_VAR}placeholder so client IDs don't end up in the persisted JSON. - Issuer URI - alone enough for OIDC discovery via
.well-knownto auto-resolve the authorization and token endpoints. Most providers need nothing more than this. - Scopes - comma-separated (e.g.
read, write). Leave blank to inherit the issuer's defaults. - Advanced (collapsible) - discloses manual
authorization_uri/token_uri/client_secret/ client auth method overrides for non-OIDC providers. - Redirect URI - the callback the playground will listen on, displayed read-only so you can register the exact value on the issuer side.
- Authorize - stays disabled until you click Save & Connect to record the registration; clicking it then opens your system browser to the consent screen.
The flow has three observable states:
- Configured - Save & Connect persists the OAuth registration but does not connect yet (no token).
- AWAITING_AUTHORIZATION - clicking Authorize opens the system browser to the issuer's consent screen and the connection sits in this state until the redirect lands. The Home dashboard surfaces a counter so half-finished authorizations don't get lost.
- Connected - once the redirect completes, the playground exchanges the code for tokens and the connection comes up like any other.
Tokens are kept in an encrypted file store under ${user.home}/spring-ai-playground/mcp/oauth-tokens/. The encryption key is derived from a per-install salt plus the host's user.home, so copying the directory to another machine doesn't disclose tokens to that host. Refresh is transparent - once you authorize, the playground keeps the connection live across restarts as long as the issuer accepts the refresh.
Use ${ENV_VAR} for client secrets
The OAuth sub-form's Client secret field accepts placeholders the same way header values do. Storing ${SOME_OAUTH_CLIENT_SECRET} in the form keeps the secret out of the persisted JSON; the actual value is read from the OS environment at connect time.
Connection risk preview
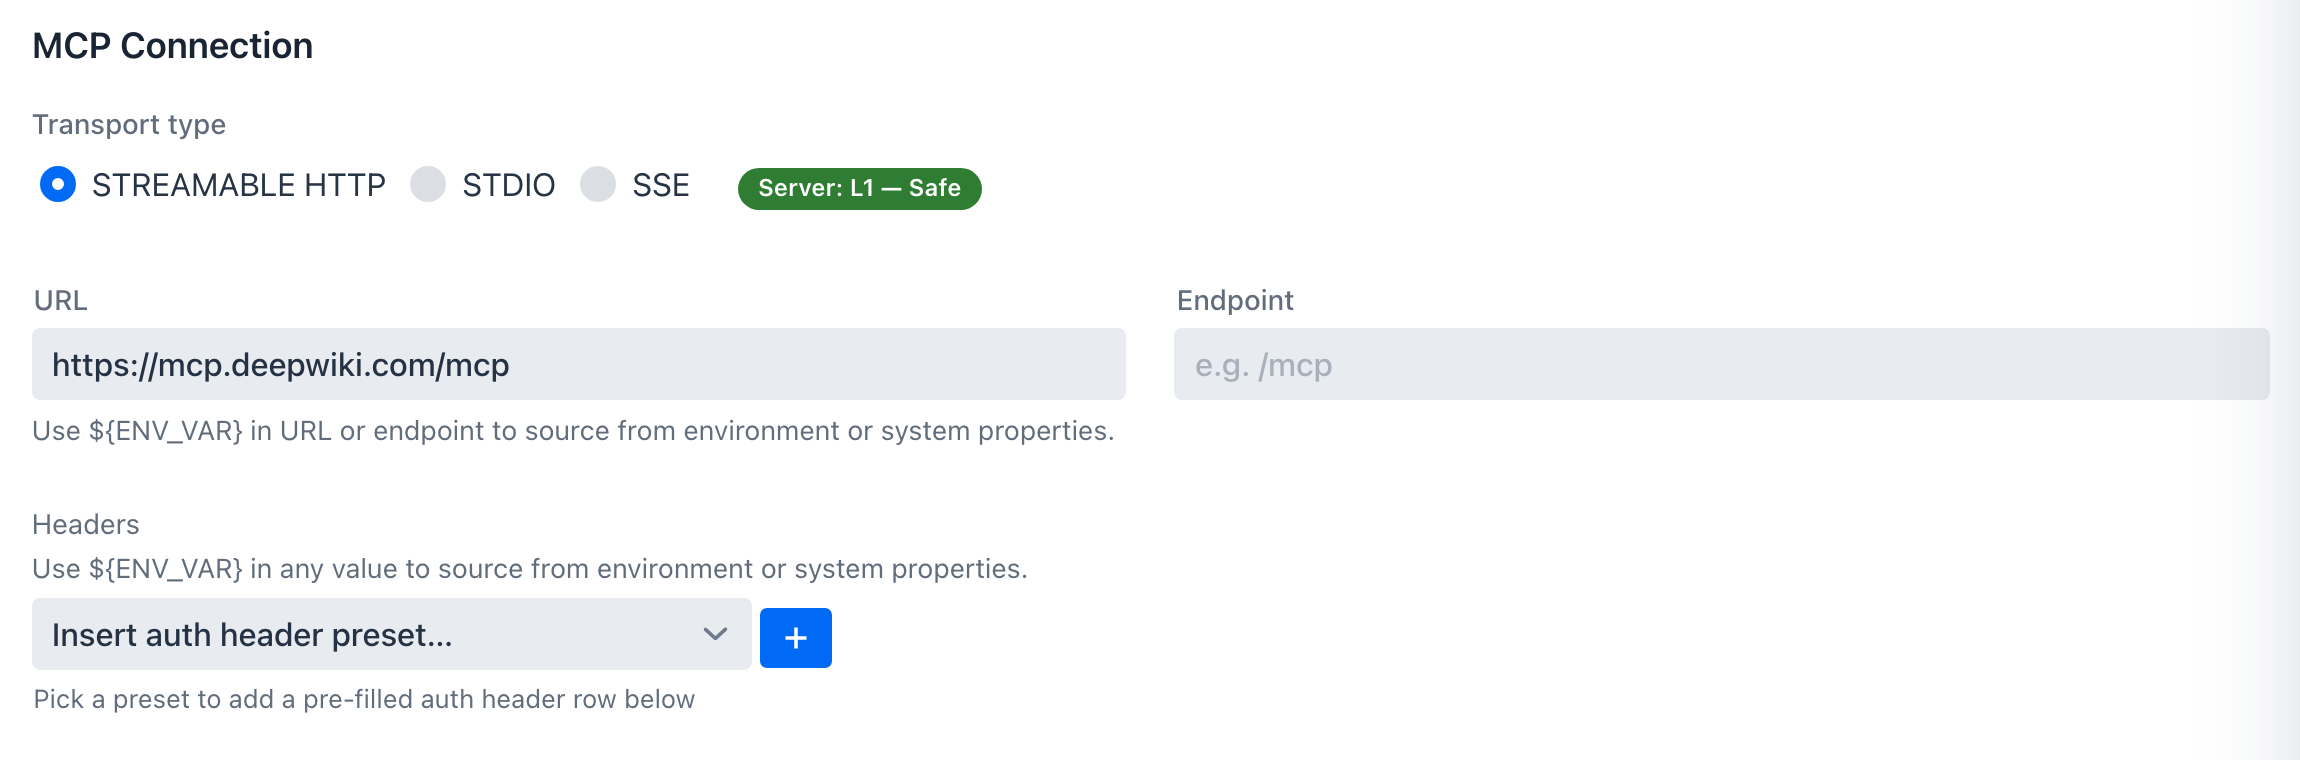
Every server config form carries a live risk chip beside the transport selector. It recomputes as you edit - pick a catalog entry or type a URL, and the chip updates before you ever click Save & Connect. The chip reflects the MCP server risk rubric: four axes (transport, auth, trust, documentation) bucketed into L0-L5, with three floor rules that jump straight to L5 - Critical.
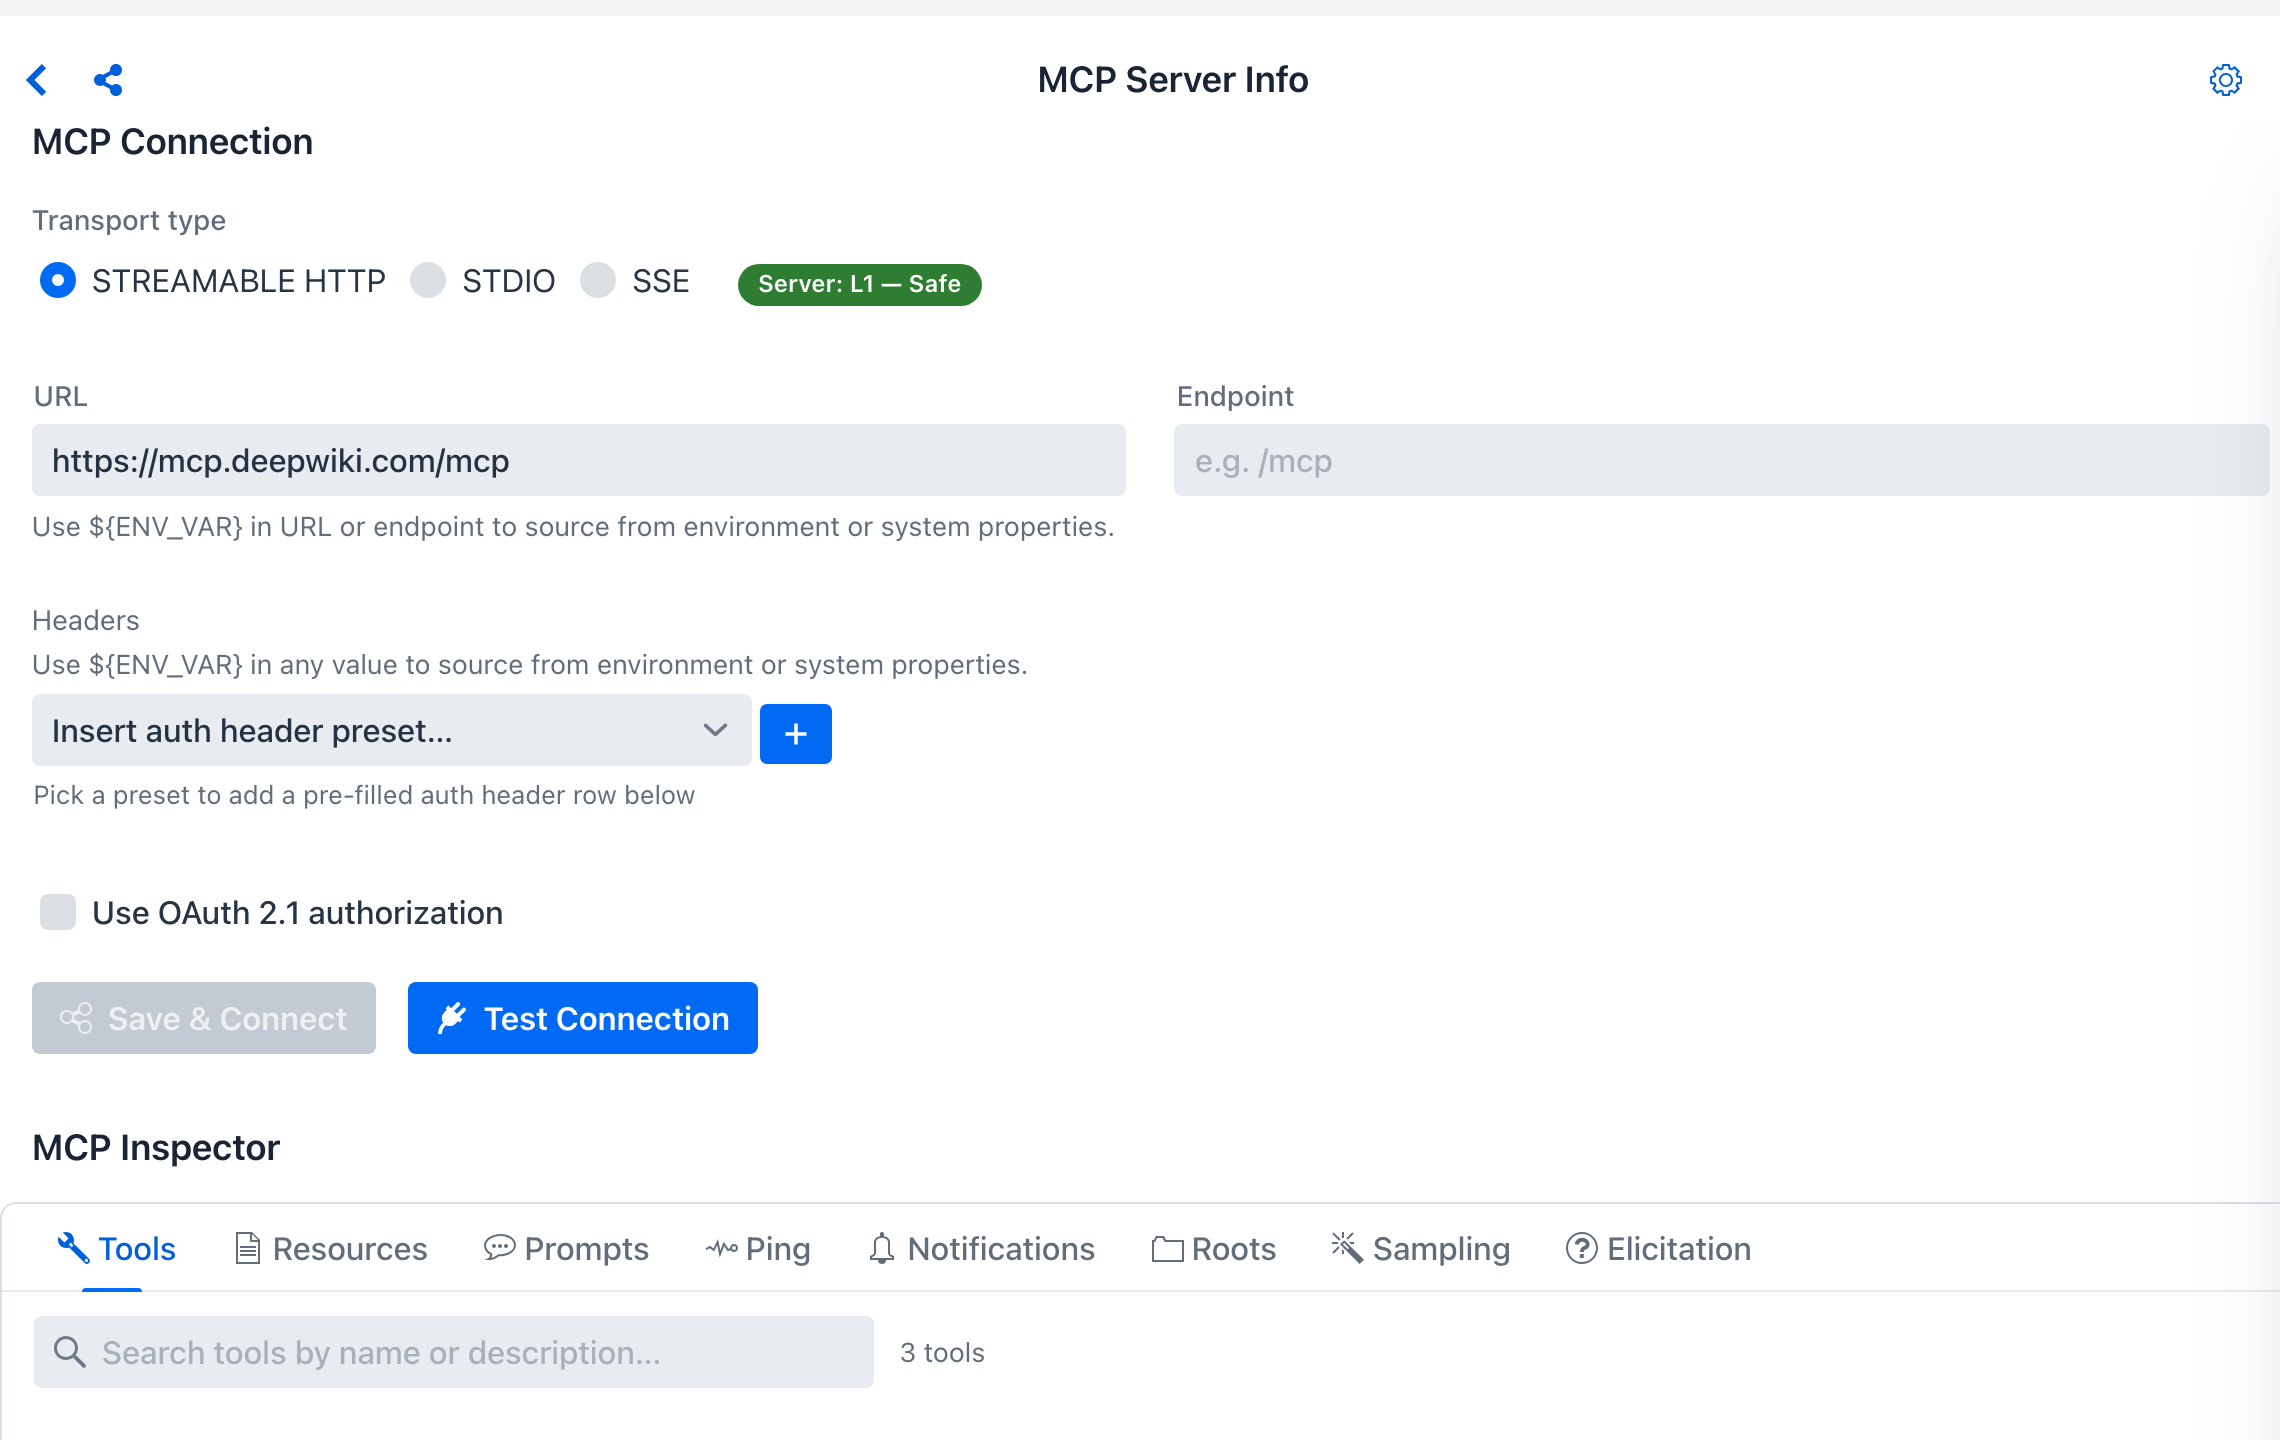
The chip sits beside the transport selector. A vendor-official catalog entry over HTTPS computes low:
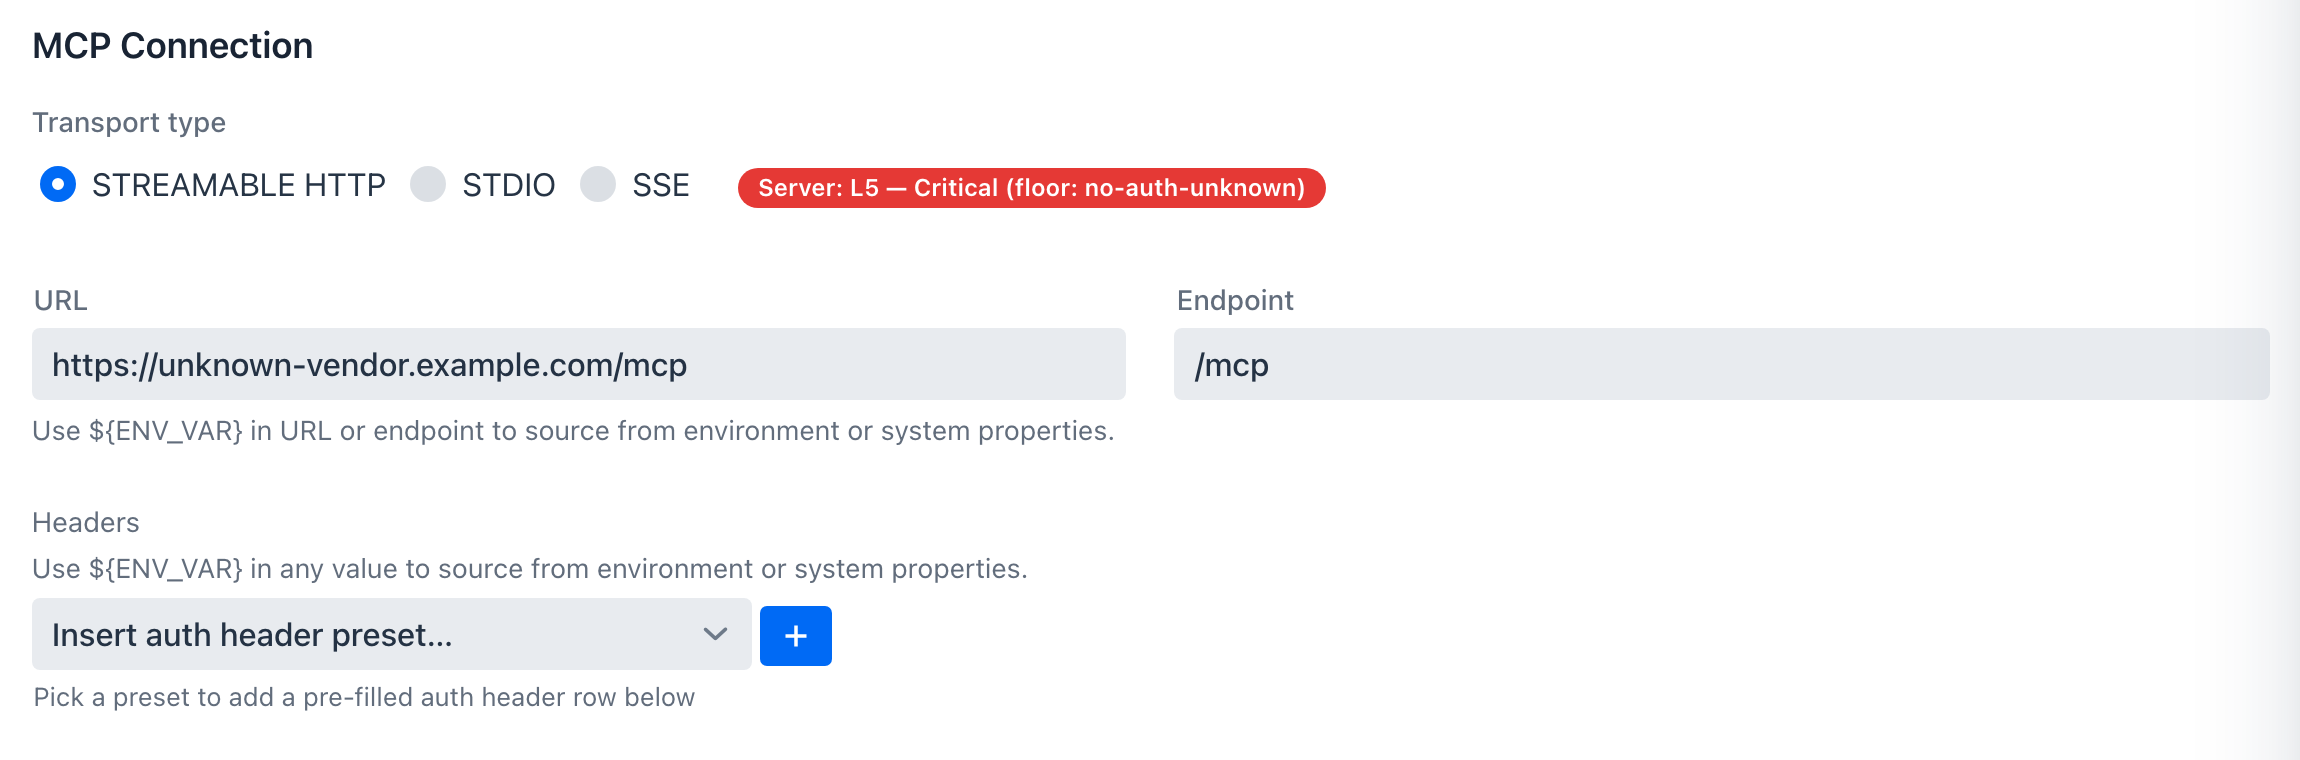
Typing an unknown public URL with no auth trips the no-auth-unknown floor and the chip turns red - a prompt to add auth or re-check the host before connecting:
The built-in spring-ai-playground server is the one exception - it shows L0 - Verified, since the risk model is bypassed for the self-loopback server. For the axis-by-axis scoring, floor conditions, the description poisoning scan, and the fingerprint ledger, see MCP Server Safety.
MCP Inspector
Once a connection is up, the MCP Inspector is where you exercise every primitive the server (or your client) exposes, isolated from chat. The eight tabs split into server primitives (Tools, Resources, Prompts, Ping, Notifications) and client primitives (Roots, Sampling, Elicitation - inverted: the server asks the playground to act as the client).
See the MCP Inspector sub-page for the full per-tab walkthrough, including the InlineResultPanel request/response/raw-toggle behaviour, JSON-Schema-typed input controls, and how to verify push notifications and OAuth-protected reads end-to-end.
Expose external tools - the MCP Server Proxy
The gear icon on the MCP Server Info header opens the Composed Tools drawer, which re-publishes selected tools from your external connections through the built-in server (spring-ai-playground-built-in-mcp) - so they're callable from Agentic Chat and external /mcp clients, each wrapped with a risk level, optional HITL approval, logging, and secret masking.
This is the MCP Server Proxy. Its dedicated page covers the full walkthrough - the per-composition risk cap, per-tool HITL and alias/description overrides, the safe-wrapping contract, the poisoning/shadowing guards, and how external clients reach the proxied tools:
Getting Started With MCP
- Pick a server - open the sidebar's Inactive MCP section and click a catalog entry, or click Add Custom Server for anything not in the catalog. See the Default MCP Servers directory for the full per-category browse.
- Fill the connection form - for catalog rows the form is pre-filled; supply only the local bits (API key via
${VAR}placeholders, tenant ID, OAuth Authorize click). For custom rows, type the URL or command + auth. Watch the risk chip beside the transport selector - it scores the connection live before you save. - Validate before saving - click Test Connection to spin up a transient client and confirm
initialize+ one-shotlistToolswork without touching the running connection map. - Save & Connect - the row moves into the Active MCP sidebar layer; the status dot turns green when the playground gets a successful ping.
- For OAuth-protected servers - complete the Authorize browser handoff once; the AWAITING_AUTHORIZATION counter on Home tracks half-finished flows.
- Inspect the live connection - exercise tools, resources, prompts, ping, notifications, roots, sampling, elicitation in the MCP Inspector.
- (Optional) Expose its tools on the built-in server - open the Composed Tools gear drawer to merge selected upstream tools into
spring-ai-playground-built-in-mcp, with a per-composition risk cap and per-tool HITL. - Use it from chat - the validated connection is now available to Agentic Chat as a tool / resource source.
Relationship to Tool Studio
Tool Studio and MCP Server are designed to work together:
- Tool Studio creates or updates a tool
- The built-in MCP server exposes it (visible as the Built-in MCP row at the top of the sidebar)
- MCP Inspector verifies the contract and runtime behavior
- Agentic Chat consumes the validated connection
This is one of the cleanest parts of the overall product flow.
The two surfaces also share a sidebar widget. The MCP Server view and Tool Studio's tool list both render through webui/common/sidebar/SidebarFilterBar (search + Categories MultiSelect + Tags MultiSelect) + CategoryGroupDetails (collapsible per-category groups) + SidebarItemLayout (status dot · name · category pill · tag pills). Filters compose identically on both screens - see Tool Studio for the same widget in its tool-authoring context.